

A tool for this transition

The Time-In ToolKit®
An all-in-one emotional regulation kit. Help your child name what they feel — and model naming what you feel.
- 6 feelings posters
- 35 PeaceMakers affirmation cards
- Activity mat + calming cards
- Digital manual & audiobook
Share
Framing And Hanging Your Time-In-ToolKit


My three-year-old had been having tantrums, like literal meltdowns, over ev-er-y-thing.
To help, we ordered Generation Mindful’s Time-In-ToolKit.
The day it arrived in the mail, we were raising the roof with excitement. My kiddo was ready to “play” and I was ready to learn some ways to help my child with his big emotions.
First step. Create a Calming Corner.
I read through the manual that came with the kit. I came across Part 4: Creating Your Calming Corner on page 15 of the manual. Oh, thank goodness, I thought. I love me a good “How To.”
The first subtitle said, Hang Your Posters. Yes, I am ready! I was now smiling like my kiddo. The section demonstrated some variations of poster layouts, which was helpful for a visual learner like me.
After reading the section, I knew a few things for sure.
- I wanted to frame our posters. With my three- and one-year-old boys, not framing them was not an option.
- I wanted to consult my son as to which posters we would hang (he chose all of them, of course!) and for the placement of the posters.
I am a mama who thrives off of inspiration. Do you know those segments of “get this look” in the magazines where they show you how to get the twelve hundred dollar designer shoes without breaking the bank? Yea? … I was looking for that kind of inspiration. I decided the best place to find it was on Generation Mindful’s Instagram page … from other mamas like me who have walked this road of framing and hanging … that beautiful road to creating a corner of connection.
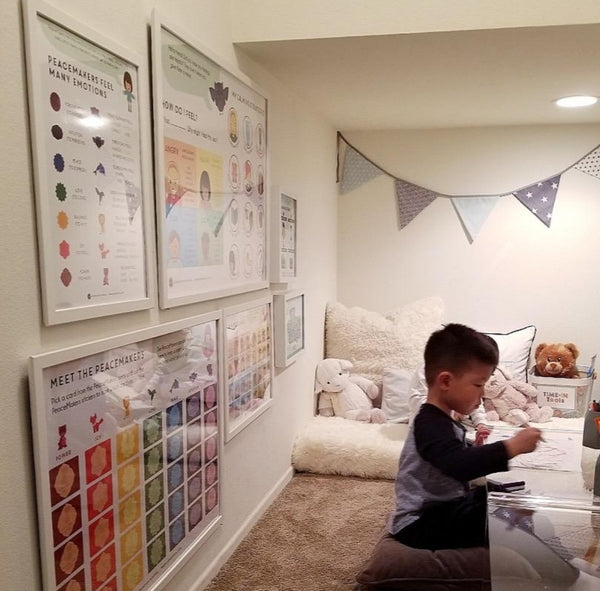
I saw their IG story titled Time-In-ToolKit and clicked there. I witnessed corners with twinkly lights, corners in big spaces, corners in closets. Some people chose to frame their posters and some chose to stick the posters straight to the wall. Here is one of my favs- small space and unframed for the win:

I realized there was no right way, just my family’s way …whatever we chose would be right for us.
I woke the next morning excited and ready to frame and hang. With my tots in tow, we headed off shopping. I wrote down the dimensions of the ToolKit’s posters and took them with me.
- Meet the PeaceMakers Poster (works with the stickers): 20" x 30"
- My Calming Strategies Poster: 20" x 30"
- 32 Feeling Faces Poster: 12" x 16"
- PeaceMakers Feel Many Emotions Poster: 8" x 10"
- My Calming Corner Poster: 8" x 10"
- Calming Steps Poster: 8" x 10"
I also had three main questions in mind:
- Which frames would work best for framing these posters?
- Where could I find the best deals on frames?
- How do I attach the frames to the wall in a kid-friendly way?
The process ended up being pretty easy, budget-friendly and, the biggest bonus, we had fun shopping, framing, and hanging together!
So, now, on to my three questions:
Which Frames Work The Best For Your ToolKit Posters?
We found ourselves in the IKEA near our home. As we were perusing the frame aisle, I found two frames that I liked, the Ribba collection and the Fiskbo collection. What I liked about these frames is that they were simple, modern, and the most important part, durable. The frame is made of fiberboard and the front is polystyrene/plastic (instead of glass), which appealed to me because my boys are … well … still working on “gentle hands”.
The main difference is that Ribba has an inside mat, while Fiskbo does not. Both frame collections come in various colors and sizes.
- Ribba has sizes of 4x6, 5x7, 8x10, 12x16, 16x20, 19¾ x 27½, 24x35¾
- Fiskbo has sizes of 4x6, 5x7, 8x10, 12x16, and 16x20, 19¾x27½
We decided to frame each of the 6 posters that came within the ToolKit. My son chose black frames. For no particular reason, we landed on the Ribba collection over the Fiskbo. Here is a quick peek of our cart.

When we got home from the store, we removed the mats from each picture frame and set them aside so that the posters would fit. We placed the posters in the frames as follows:
- 8" x 10" - My Calming Corner Poster, Calming Steps Poster, and PeaceMakers Feel Many Emotions Poster
- 12" x 16" - My 32 Feeling Faces Poster
- 19 ¾" x 27 ½" - Meet the PeaceMakers Poster and My Calming Strategies Poster
For the Meet the PeaceMakers and My Calming Strategies Posters, you have a couple of options. You can purchase the 19¾ x 27½ frame as I did and trim the white border of the posters a bit to make them fit, or you can purchase the 24 x 35¾ frame and leave the mat in, which also looks great. It depends on the look you like and the wall space available to you inside your home.

Where Can I Find A Deal On ToolKit Posters?
IKEA
From the research I did, IKEA’s Ribba and Fiskbo collections were the lowest priced option. You can purchase in-store or via their website.
One thing I noticed about the Fiskbo collection when shopping online is that some sizes came only in certain colors. When looking for black frames, I was unable to find the 8" x 10" and 19 ¾" x 27 ½" sizes. When looking for white frames, I was unable to find 8" x 10".
When shopping on IKEA’s website for the Ribba collection, I was able to find every color in both black and white.
Amazon
I also found the Ribba and Fiskbo picture frames on Amazon. While it came with free shipping, the frames were way too pricey. Spending $59.99 for one IKEA Ribba frame sounded bananas to me. That’s a hard pass. Additionally, on Amazon, the Fiskbo frames had weird sizing … for example, instead of an 8" x 10" (which would fit the poster), they offered 8 ½ " x 11 ¾ " (which would leave a bunch of white space for the smallest ToolKit poster and not enough space for the 12" x 16" posters).
So I started looking for frames outside of IKEA’s brand on Amazon. I was looking for picture frames with the polystyrene/plastic face. Amazon is great if you are looking for a particular size in bulk, however, I didn’t want a pack of 4 … 12 … or 60.
I did end up finding some frames that fit the bill and created an Amazon list that has a mix of frames with some options.
Michaels
Michaels offers the Belmont collection, which offers frames with a polystyrene/plastic face. One mama on the GENM site said she purchased all of her frames in-store from Michaels. When I looked online, I was unable to find all of the sizes needed. Here is her Calming Space:

How Do I Attach The ToolKit Posters To The Wall In A Kid-Friendly Way?
We opted for no holes in the wall and something that was durable (again, enter the “we are working on gentle hands” skillset) and opted for double-sided velcro, which I found on Amazon.
This was super easy. First, we chose where we wanted each poster. Once we had it mapped out, it was time to attach the velcro.
- Pull off the paper on the back to reveal the sticky part of the velcro and attach it to the frame.
- Repeat the first step and attach that piece of velcro to the wall.
- Press the two pieces of velcro together.
- Repeat for each poster.

And voila, your posters are hanging.
Here’s a set hung In FISKBO white frames:
While there is no “right” way to frame and hang these posters, my hope is that this helps take some of the guess-work out. To all of my fellow time-in using parents out there, high fives, and happy creating! We are changing the world, one well-loved child at a time.
______________
*** Ashley is a mama to three children; two boys and a daughter born to Heaven. She is an occupational therapist, parent educator, certified holistic lifestyle coach, and Chief Storyteller with Generation Mindful. Ashley is an education seekin', acai-bowl lovin', Sunday brunch-havin', free-spirited mama.
Generation Mindful creates educational tools, toys, and programs that nurture emotional intelligence through play and positive discipline. Join us and receive joy in your inbox each week.


